Thursday, July 31, 2014

Classic Toll House (Chocolate Chip) Cookies

Plus a touch of butterscotch!

My favorite "go to" Chocolate Chip recipe is on the back of the NestlĂ©'s Chocolate Morsels package.  In fact, I've made them so many times over the years, the recipe is ingrained in my mind.

I can only remember one complaint.  That's when my little granddaughter, Danielle and her twin sister, Andrea, were staying with us for an overnight.  My husband bought me a new Kitchen Aid mixer.  I was so excited, I couldn't wait to try it.  So, of course, cookies were a must, since they were the twins' favorites.   Now, they were excited too!

But, once I started adding all the ingredients and turned the machine on, Danielle became very upset.  I turned the mixer off and asked what was wrong.  She started crying, "You can't use that!  They won't be homemade anymore!"   She never did buy the explanation that you don't have to mix by hand to make "homemade."  

Danielle is with the Lord now, and I'm so grateful for all the sweet memories that Andrea and I have. Many, like this one makes me smile.  And guess what?   Now, I always mix these cookies by hand...for Danielle. 

You don't have to add the butterscotch morsels, if that's not your thing. Just increase the chocolate ones to 2 cups and you've got the original recipe, which is my absolute favorite!  Why?  You ask.  All chocolate, of course!  Haha! 


Ingredients:

1 c. butter (2 sticks)
3/4 c. light brown sugar, packed
3/4 c. granulated sugar
2 eggs
1 tsp. vanilla
1 c. chocolate morsels (increase to 2 c. if you're not adding the butterscotch morsels)
1 c. butterscotch morsels (optional)
1 c. chopped nuts (optional)
2 1/4 c. flour
1 tsp. baking soda
1 tsp. salt.


Preheat oven to 375'F.

Combine flour, baking soda & salt in separate bowl.  Stir together and set aside. 

Mix butter, sugars, eggs, and vanilla until creamy, and all the lumps are out. 

Add morsels (if you don't like butterscotch, just switch to 2 cups chocolate)  Gradually, beat in flour mixture.   If you want the cookies a little thicker, just add 1/4 c. more flour.  We like ours a little flat, crunchy on the outside & chewy in the middle.  Drop by rounded tablespoons onto ungreased baking sheets.

Bake cookies for 8-10 minutes or until golden brown.  Cool on baking sheet for 2 minutes; remove to wire racks to cool completely.

A Tip from Grammy:
-Don't be afraid to play with this recipe.  You can add different kinds of chips, nuts, raisins, even marshmallows.  Roll a ball of dough and hide a Rolo candy inside before baking.  
-Bake them with your children, and, most of all have fun together!  
-Make memories!
-If you want those crisp edges and chewy center, about half way through baking, lift the baking sheet while still in the oven and let it drop. Then when they are done, let the baking sheet drop again. They will flatten and have that bakery edge many like. 

Be encouraged!
"It's not about having great faith, but simply having faith in a great God!"


Wednesday, July 30, 2014

Glazed Lemon Blueberry Scones

Perfect for breakfast or brunch, with coffee...or just a sweet treat!

This morning, I attempted to make scones for the first time!   See, you can teach an "old dog, new tricks!"   It does sound rather odd to think, at my age, there's a first for anything.  And now, I have a new obsession in the kitchen.  I'm already planning pumpkin scones for Thanksgiving and Cranberry Orange Scones for Christmas.

Fresh scones are so much better than store bought ones!   They're so fresh, moist and tender...well, there's just no comparison.   I know I use the word "easy" to describe many of my recipes on here, but these are so EASY and taste FANTASTIC!  

I highly encourage you to try making these, but, I do have a one-word warning attached, "Addictive."   A little piece fell off one, so I felt it was my duty to dry "just one bite" and ended up eating the whole thing.  Don't judge...I just couldn't help myself!


Ingredients:

2 cups unbleached flour
2 tsp. baking powder
3 Tbsp. granulated sugar
1/2 tsp. salt
1/2 c. (1 stick) cold butter (cut into small pieces)
1 c. fresh blueberries
zest of 1 lemon, grated fine 
1 c. heavy cream (plus more for the top of scones)
Dash of vanilla (about 1/2 tsp.)

Heat oven to 400'F. 

First, sift the dry ingredients together in a large bowl.

Using 2 forks or your fingers, cut in the butter to coat the pieces with the flour. (I did this by hand).  The mixture should end up looking like coarse crumbs.

Make a well in the center and pour in the heavy cream & lemon zest.  Fold everything together until just mixed; do not over work the dough or the scones will be tough.  Gently, fold the blueberries into the dough, taking care not to mash them.

Press the dough onto a lightly floured surface and form into a rectangle. (Don't use a rolling pin, it will smash the berries.)  Cut the rectangle in half then cut the pieces into half again, giving you 4 squares. Cut the squares in half on a diagonal to give you a triangle shape.  Makes 8.

Mix together a small amount of heavy cream and a dash of vanilla.  Brush the tops of the scones and sprinkle with a little sugar.

Place scones on an ungreased baking sheet and bake at 400'F until golden brown and the blueberries have burst, about 15-20 minutes.  Let cool a bit before you apply the glaze.


Lemon Glaze:

1 cup Confectioner's sugar
3-5 Tbsp. lemon juice (add 1 Tbsp. at a time)

Mix the confectioner's sugar and lemon juice (1 Tbsp. at a time) until the desired consistency.  Whisk the glaze until all lumps are out, and drizzle over cooled scones.

You'll never buy scones again!


"The greatest blessing in the whole world is being a blessing!"  J
ack Hyles


Tuesday, July 29, 2014

Bowtie Pasta with Italian Sausage & Cream Sauce

Papillon con salsiccia e crema di italiano

You're right, I'm just messin' with ya'!  It's Bowties with Italian Sausage & Cream!  But doesn't it look (and sound) dreamy in Italian? 

A few years ago, my close friend, Linda, made this dish for me and my husband, and it tasted like food from a fine Italian restaurant.  I had never added cream to my sauce before and wasn't quite sure if I'd like it...I had no need to be concerned!  It was delicious and quickly became a favorite of ours.  

It's a great meal for company too, because it makes a lot, and it's a quick, easy dinner to prepare.  You won't believe how easy!  This dish also makes a great presentation when you bring it to the table too.

Me & Linda
Remember, the sauce is not to be poured over the pasta, it's to be mixed in with it, so the pasta absorbs the sauce and every bite is a scrumptious combination of flavors!


Ingredients:
lb. box of Bowtie pasta (Farfalle)
1 Tbsp. olive oil
1 lb. sweet Italian sausage (casings removed and crumbled)
1/2 tsp. red pepper flakes
1/2 c. diced onion    
3 cloves garlic, minced
1/2 tsp. dried Italian seasoning (optional)
1 (28oz. can) Italian style plum tomatoes, drained & coarsely chopped
1 1/2 c. heavy cream
1/2 tsp. salt
2 Tbsp. fresh parsley, minced

Bring a large pot of lightly salted water to a boil. Cook pasta in boiling water for 8 to 10 minutes, or until al dente; drain.

Heat oil in a large, deep skillet over medium heat. Cook sausage and pepper flakes until sausage is evenly brown.  Drain any extra grease from the pan.  Then, stir in onion and garlic, and cook until onion is tender. Stir in tomatoes, cream, and salt. Simmer until mixture thickens, 8 to 10 minutes.

Stir cooked pasta into sauce, and heat through. Sprinkle with parsley and a little freshly grated parmesan.


Be encouraged!
"Step out into the invincible future with Him"  -Oswald Chambers

Sunday, July 27, 2014

Penne with Vodka Sauce

Molto delizioso!

This is the first time I've ever tried making Vodka Sauce, and it won't be the last.  Wow!  Who knew how easy it is to make. 

The liquor burns off as you cook it for a few minutes (no, I didn't light it on fire, like the true chefs do).  I'm too chicken for that!   Besides, I know from experience how easy it is to set your kitchen on fire.  Anyway, I did let it cook long enough to leave only the mild taste of the Vodka.

Okay, now you're wondering about the fire I started, aren't you?   It was our first house, a cute, little bungalow, where I was determined to make everything from scratch.

I got the bright idea to make homemade French fries to go with our burgers that night for dinner.  As I was heating up the grease, I went to the front, enclosed porch to put a sweater on my 18 month old baby girl, who was playing out there.   Just then, my neighbor came home and we started chatting...big mistake!   Before I knew it, there was a huge POP and I ran to the back of our little house to the kitchen.  It was in flames, and they were already out of control.  All I can remember is "flying" back to the porch, grabbing my baby and running out the door, down the front steps, with the flames right behind me.  I use the term flying because I don't remember my feet touching the floor!  Very scary stuff, I tell you!  

My husband was taking a friend home from work, and saw smoke coming from down the block.  He thought the neighbors were outdoor grilling some hot dogs & burgers.  Boy, was he in for a surprise. The house was gutted and we never did move back there.  

I learned two valuable lessons that day, 1: Never leave grease heating up on the stove and 2: not everything has to be made from scratch!  Ha!

You can imagine, it took me awhile to go back to the kitchen and cook anything!  But, I must confess that to this day, all our French fries come from the frozen section and are baked in oven.

Ingredients:

Kosher salt
1 lb. (1 box) penne
1 28 oz. can crushed tomatoes
1 Tbsp. butter
1 Tbsp. olive oil
2 large shallots, minced
1 clove garlic, minced
1/4 tsp. red pepper flakes
1/2 lb. prosciutto, thinly sliced and cut into 1" pieces
1/2 c. vodka
2/3 c. heavy cream
1/2 c. freshly grated parmesan cheese, plus more for topping
Handful of fresh basil leaves, torn, plus more for topping

Bring a large pot of salted water to a boil.  Add penne and cook as the label directs.  Reserve 1/2 c. cooking water, then drain the pasta. 

Meanwhile, melt the butter and olive oil in a large skillet over medium heat.  Add the shallots and cook, stirring occasionally, until slightly softened, about 3 minutes.  Add the garlic and red pepper flakes and cook, stirring, 30 seconds. Add prosciutto and cook 3-4 minutes.  Remove from the heat and stir in the vodka, crushed tomatoes and salt to taste.  Return the skillet to medium heat and simmer, stirring often, until the alcohol cooks off, about 7 minutes.   Stir in the heavy cream and cook until the sauce thickens slightly, about 3 minutes.  Stir in the parmesan and basil.

Add the pasta to the sauce and toss to combine, adding some of the reserved cooking water to loosen, if needed.  Season with salt.  Serve, topped with more parmesan and basil.

Serves 6

"Beloved, let us love one another, for love is from God, and whoever loves has been born of God and knows God." 
                                                                                     -1 John 4:7


Blueberry Streusel Muffins

Bursting with Flavor!


The common muffin becomes sensational when you add plump, sweet blueberries.  

It's a real treat to set out a basket of these moist blueberry muffins with streusel topping, and watch as your friends and family devour them. 

My granddaughter was sure she didn't like blueberries, and then she tasted these...and we have a convert! 

I love using fresh blueberries, but frozen will do fine, if the blueberries are not in season.  There's no need to defrost them...you'll end up with "all blue" blueberry muffins.  They would be great for a Smurf Party. 


Ingredients:

1/4 c. butter, softened
1/3 c. sugar
1 egg
1 tsp. vanilla extract
2 1/3 c. all-purpose flour
4 tsp. baking powder
1/2 tsp. salt
1 c. milk
1 1/2 c. fresh or *frozen blueberries (I use fresh)

Streusel Topping:

1/2 c. brown sugar
1/3 c. all-purpose flour
1/2 tsp. ground cinnamon
1/4 c. firm butter


Combine the flour, baking powder and salt in a bowl; set aside.  In a large bowl, cream butter and sugar.  Beat in egg and vanilla; mix well.  Now, add flour mixture to creamed mixture alternately with milk, but don't over mix.  Gently fold in most of the blueberries, but save some to place a few on the top of each muffin, if desired.

Fill 12 greased or paper-lined muffin cups two-thirds full.  An easy way to fill tins is to use an ice cream scoop.  (I got 14 large muffins with this recipe.)


In a small bowl, combine the sugar, flour and cinnamon; cut in butter until crumbly.  Sprinkle over muffins.

Bake at 375° for 15-20 minutes or until  a toothpick inserted in the middle comes out clean. Cool for 5 minutes before removing to a wire rack. Serve warm. Yield: 1 dozen.

*If using frozen blueberries, use without thawing to avoid discoloring the batter.


Hint:  Remember, don't over-mix the batter or the muffins will get tough. 


"Faith sees the invisible, believes the unbelievable, and receives the impossible."   - Corrie ten Boom


Saturday, July 26, 2014

Blueberry Pie

Fresh pie from the oven...classic is always best!

I wish you were here to smell the aroma of this fresh, blueberry pie, baking in the oven!   I saw blueberries on sale yesterday and knew I had to make a pie...it's been awhile since I've made a blueberry pie, and it's one of my favorites.  Actually, that's probably why I don't make it often...I tend to lose what little self-control I do have around my favorite foods.

As a little girl, my father would take me into the woods near the railroad tracks to pick wild blueberries.  He knew exactly where to look for them.  I tried not to eat too many, so mom could make us a pie, but, I'm afraid we ended up spending much more time picking than Dad intended.  You guessed it!  I ate more than I picked.   But, in my defense, those beautiful, sweet, succulent little berries called my name.   I probably ate a quart before we even got out of the woods.

This is a simple recipe...a little sugar, cinnamon, lemon and flour to thicken the juices from the blueberries.  I use my mom's pie crust recipe, but, you can use your favorite or buy the refrigerated ones.  You'll need two, it takes a bottom and top crust.

Ingredients:
Pastry for 9" two crust pie (use your own, store bought or my Mom's Flakey Pastry)
2/3 c. sugar
1/4 c. plus 2 Tbsp. flour
1/2 tsp. cinnamon (opt.) 
5 c. fresh blueberries
2 Tbsp. lemon juice
3 Tbsp. butter

Heat oven to 425'F.  Prepare pastry.  Stir together sugar, flour and cinnamon; mix with berries.  Turn into pastry-lined pie pan; sprinkle with lemon juice and dot with butter.

Cover with top crust, which has slits cut into it.  (I made the lattice top for this pie). 

Place the pie on the middle rack of the oven with a cookie sheet or aluminum foil below it on the lower shelf.  This will catch any juices in case they bubble over.   

Bake for 12-15 minutes at 425°.  Reduce heat to 350°F and bake for 30 to 40 minutes more or until juices are bubbling and have thickened. 

Check after lowering heat, to see if crust is browning too fast.  Make a tent of aluminum foil, and cover the crust loosely. 

Transfer to a wire rack to cool. Let cool completely before serving


Be encouraged!
"Taste and see that the Lord is good; blessed is the one who takes refuge in Him."  -Psalm 34:8


Friday, July 25, 2014

Quick & Tasty Dinner Rolls

Ready in 60 Minutes

Nothing smells better than bread baking in the oven, the aroma is unmistakable and irresistible!   But baking bread needs planning, it just isn't something you can do on the spur of the moment...until now!

From start to finish, these rolls are quick to make (about an hour) and tasty to eat.  These are the perfect rolls for those nights when you want dinner ready and on the table in an hour, and no one will ever guess that they didn’t take you hours of kneading, rising, and prep. 


Ingredients:                       

1/4 c. low fat milk
2 Tbsp. granulated sugar
1/4 c. softened butter, divided
3 1/2 tsp. dry active yeast
3/4 c. warm water (105F-115F)
2 1/2-3 c. all-purpose flour
1/2 tsp. salt

Grease a 12 cup muffin tin; set aside.     

In a small saucepan, stir milk, sugar, and 2 Tbsp.. butter together.  Heat on low, just until butter melts and sugar dissolves.  Cool to about 100F-105F.

Pour milk mixture into the bowl of a stand mixer.

Add the yeast and warm water.  Let stand for 5-10 minutes or until yeast is foamy.

Add 2 cups flour and salt to yeast mixture.  Using a dough hook, mix on low speed for about 1 minute.

With the mixer still going, add remaining flour, 1/2 cup at a time.  Mix about 1 1/2 minutes, or until dough starts to clean the sides of the bowl.

Knead on low speed for about 2 more minutes, or until dough is smooth and elastic - the dough will still be slightly sticky to the touch.

Place dough in greased bowl, turning it to grease the top.  Cover the dough with a clean dish towel.

Let it rise in a warm place, free from draft, for about 15 minutes.

Turn the dough onto a lightly floured surface, and divide into 12 equal pieces.

Form each piece into a ball and cut each ball into thirds.

Place 3 dough balls in each muffin cup.

Cover the muffin pan with the dish towel, and let the dough rise for about 15 minutes.

Melt remaining 2 Tsp. butter.  Set aside.

Bake at 425'F for 9-12 minutes, or until the rolls are golden brown.

Brush rolls with melted butter.

Remove from pans, and cool slightly on wire racks before serving.

A Tip from Grammy: 
Here's a secret!  Your dough will rise faster if you place the bowl it's in on a heating pad (low-medium setting).  It's another time saver, and really works great!


Be encouraged! 
"Then Jesus declared, “I am the bread of life. Whoever comes to me will never go hungry, and whoever believes in me will never be thirsty."    -John 6:35

Thursday, July 24, 2014

German Sweet Chocolate Chip Cake

Andy's Favorite Dessert


This is one of my favorite cakes, and as you can tell by the title, one of Andy's too!  Who's Andy, you ask?   He was a piano student of mine, many years ago.  I was so blessed to be his teacher and had the added bonus of having his mother as my best friend! 

As a reward for a good lesson, I always had a variety of "fun-size" candy bars for my students.  So, when a very young Andy came to his first lesson, I, of course, asked him what his favorite candy was.  I wanted to be sure to add it to the basket of goodies on the piano.  He looked at me with a serious expression and, without skipping a beat, he stretched out his little arms and replied, "Those great big Nestle Crunch bars!"   I almost fell off the piano bench, laughing!   He stole my heart right then and there. 

I made this cake one night when his family came over for dinner.  He loved it!  So, for his High School graduation, I decided to make him his own cake.  I found out later, that he hid it under his bed and he ate it all...still cracks me up!  I'm posting this today and making sure his beautiful new bride, Courtney, gets this recipe.  I know she'll make it for him...and I'm sure this will secure their marriage forever!  Haha!

Ingredients:
1 (4oz.) bar German Sweet Chocolate
1 box yellow cake mix (whatever your favorite brand)
1 (3.4 oz.) box vanilla instant pudding
1 c. whole milk
1 c. vegetable oil
4 large eggs
1 c. semi-sweet chocolate chips

Place rack in the center of the oven and preheat to 325'F.  Spray a 10" tube pan (or three 8" loaf pans) with cooking spray, then dust with flour.  Shake out excess flour and set aside.

Break the German chocolate bar into four pieces.  Grate the bar using a food processor or a hand grater until it is finely grated.  (If using a food processor, insert the steel blade and drop the chocolate pieces into the processor one at a time.)   Set aside. 

(Time-saver tip- I found out, recently, that you can also melt the chocolate, and I'm thinking this has got to be easier!)

Place the cake mix, pudding mix, milk, oil, and eggs in a large mixing bowl.  Blend with an electric mixer on low for 1 minute.   Fold in the grated chocolate, and scrape down the sides of the bowl with a rubber spatula.  Increase the mixer speed to medium and beat 2 minutes more scraping the sides down again if needed.  Fold in the chocolate chips.  The batter should look well blended and the chocolate chips should be evenly distributed.  Pour the batter into prepared tube pan (or loaf pans), smoothing out with the rubber spatula.  Place pan in oven.

Bake until golden brown and the center springs back when lightly pressed with your finger, 55-58 minutes for tube pan (50-52 minutes for loaf pans).  Remove from the oven and place it on a wire rack to cool for 20 minutes for tube pan (5-8 minutes for loaves).

Run a long, sharp knife around the edge of the cake and invert it onto a rack, then invert it again onto a cake/serving plate so it is right side up.  Allow it to cool 30 minutes more. Dust with confectioner's sugar if desired.

**This recipe comes from "The Cake Mix Doctor" book by Anne Byrn.  Her recipes use cake mixes to make great desserts, with that made-from-scratch taste!   A really wonderful cookbook!


Be encouraged!
"God loves each of us like there was only one of us to love!"   -Max Lucado


Wednesday, July 23, 2014

Cherry Cookies

Light & Delicate Little Gems

Aunt Rose is standing front right.
I don't really remember living upstairs from my grandmother's sister, Rose, but I sure do remember Aunt Rose.  I was her favorite and she lived to spoil me!

My mom, dad, grandmother, brother, aunt and myself, all lived above her in a duplex home until I was around three.  I learned very early, that when I came along Aunt Rose had a special place in her heart for me.  If my mom tried to correct me or punish me for being naughty, I'd cry through the old register vent on the floor and call out to Aunt Rose for help...she'd come running.  And, according to my cousin, Dee, I was the only one that was allowed to play with her expensive silver tea set.  She really loved me!  Hehe!

We stayed close even after we moved into our own home.  I still can taste her meatballs, and recall the softness of her hair when I would roll it onto her old wire curlers, and then, when dried, I'd brush it out and fix it for her. 

Her "cellar" had stone walls, with dirt flooring. Every so often, a big truck filled with coal, would pull up to the cellar window. It dumped a load of that pitch black coal into a bin, and we would help shovel it into the furnace. We'd also used it to draw on the sidewalk for a game of Hopscotch.  Yes, I'm old, but I have some of the best memories ever!

It was Aunt Rose that made these tender, cake-like cookies for Italian wedding trays, Christmas, or ME!  Told you she loved me!

I added the little drizzle of frosting when I decided to include them in my Christmas cookie tray, and they were wonderful.  But, don't wait for Christmas or a wedding...try them anytime! 

One last thing! This is a large recipe and I usually only make half...that's about 4 dozen cookies. 


Aunt Rose's Cherry Cookies

Ingredients:
3/4 c. shortening
1 1/2 c. sugar
1 (10 oz.) jar of cherry juice (reserve cherries)
4 eggs
4 tsp. baking powder
1 1/2 tsp. vanilla extract
1/2 tsp. almond extract  (*optional) 
4 c. flour (add slowly to rolling consistency)

Preheat oven to 375'F.

Beat shortening and sugar until fluffy.  Add egg, cherry juice and extract.  Mix well.  

Add baking powder with the first cup of flour.  Add flour in small amounts until the dough is soft, but holds its' shape when you roll them into 1 1/2" balls. (I scoop them out with the smallest cookie scoop.) 

Cut cherries in half, press 1/2 cherry gently into the top and brush with beaten egg.  

Bake in preheated 375' oven for 8-10 minutes.  Careful not to over bake them!

Glaze:
1 c. confectioner's sugar
1/8 tsp. vanilla
1-2 Tbsp. hot water

Beat until smooth and swirl over each cookie.  So pretty!


Be encouraged!
"And in the same region there were shepherds out in the field, keeping watch over their flock by night. And an angel of the Lord appeared to them, and the glory of the Lord shone around them, and they were filled with great fear."         -John 2:8-9


Tuesday, July 22, 2014

Chicken-Spinach-Bean Soup

Delicious anytime of the year!


Every time the weather changes and Autumn is in the air, I crave soup. Beautiful Autumn, when the trees begin to change colors, bringing a dazzling display of different colored foliage, which eventually drops off into our yards and creates a playground of crunchy leaves for children to jump and play.

It also brings cooler temperatures, and, as it progresses, we put away our summer clothes, and bring out our warm sweaters.  I love to wear my sweats during the winter in the house because they are so warm and cozy!  And, it's time to bring in the wood and start the fire in the fireplace. Now, that is cozy!  


The only thing that could make this better would be a bowl of warm, fresh, delicious soup.   This one is a winner and you'll love the simple preparation that goes with it. 

However, it's nowhere near Autumn right now, in fact it's only February and not too cold here in the Carolinas, but I'm still wanting this delicious soup. Really, isn't soup for ANYTIME of the year? LOL!

Ingredients:

2 tsp. extra-virgin olive oil
2 leeks (white and light green parts only)cut into 1/4" rounds
1 small pkg. fresh spinach, coarsely chopped
1/4 tsp. dried sage (if you use fresh sage, increase to 1 Tbsp., chopped)
2 (14 oz.) cans chicken broth (I use reduced sodium)
2 c. water
Salt & Pepper to taste
1 (15 oz.) can cannellini beans, rinsed
1 (2 lb.) roasted or rotisserie chicken, skin discarded, meat removed from bones and shredded (about 4 cups)
1/2 c. diced tomatoes
1-1 1/2 c. D'Italini pasta

Heat oil over medium heat.  Add leeks and cook a few minutes, until tender.  Stir in sage, broth and water, cover and bring to a boil.  Add rinsed beans, diced tomatoes and chicken.  Cook uncovered, about 3-5 minutes.  Add fresh spinach. 


Serve in a bowl, over D'Italini pasta, rice or noodles.


Be encouraged!
"Be strong and courageous. Do not fear or be in dread of them, for it is the LORD your God who goes with you. He will not leave you or forsake you.”  -Deuteronomy 3:16


Chicken a la King

A Vintage Recipe

 
I first made this dish when I was just a young bride and trying to impress my new husband.   I had no idea, at that time, how simple it was to make or how delicious it would be.  It turned out to be a favorite. 

Then, over the years, I forgot about it,  until going through my old Betty Crocker Cookbook published in 1969, and there it was!!!   Does anyone else still have the big, red book from Betty?   The binding is broken on mine and I keep using duct tape to hold it together, and the pages have stains from my splatters & drips, but, I still love it!   I believe it's one of the best cookbooks ever written. 

So, I decided to try that old chicken recipe again, after all these years, and see if my granddaughter and her hubby would enjoy it too.  Was it still as magical as I remembered?  Well, guess what?  It was...and now it's a new, old-favorite!   Yay!


Ingredients:
 
1 (6 oz.) can sliced mushrooms, drained (reserve 1/4 c. liquid)
1/2 c. diced green pepper
1/2 c. butter
1/2 c. all-purpose flour
1 tsp. salt
1/4 tsp. pepper
2 c. light cream
1 3/4 c. chicken broth
2 c. cooked chicken, cubed
1 (4 oz.) jar pimientos, chopped
1 box of frozen puff-pastry shells
 
In large skillet, cook and stir mushrooms and green pepper in butter 5 minutes.  Blend in flour, salt and pepper.  Cook over low heat, stirring until mixture is bubbly.  Remove from heat.  Stir in cream, broth and reserved mushroom liquid.  Heat to boiling, stirring constantly.  Boil and stir 1 minute.  Stir in chicken and pimiento; heat through.  Serve in hot puff-pastry shells.
 
Yields: 8 servings

"Do not merely listen to the word, and so deceive yourselves. Do what it says." - James 1:22


Saturday, July 19, 2014

Antipasto Salad

Insalata di antipasti...a meal in itself!

Click to enlarge

Antipasto actually means "before the meal" and is the traditional first course of a formal Italian meal.  It includes, cured meats, olives, pepperoncini, anchovies, artichoke hearts, and various cheeses.  Turn it into a salad and there are so many goodies in it that it becomes a meal.  Add a loaf of hot, fresh garlic bread and a dessert.  Well, it my humble opinion, it just doesn't get any better than that!

This has an array of wonderful vegetables, meats and cheeses.  Served it on a platter, instead of in a salad bowl, and it makes a beautiful presentation. 


Ingredients:
1/2 head of each, Romaine, Butter & Iceberg Lettuce - rough cut into bite-size pieces
1 container grape tomatoes, cut in half
1/2 small red onion, sliced thin
1/2 lb. of Genoa Salami, sliced thin
1/2 lb. ham off the bone, sliced thin
1/2 lb. Provolone cheese, sliced thin
1/2 lb. fresh Mozzerella, cut in pieces
1/4 lb. Kalamata olives
1 15 oz. can of artichoke hearts, cut in quarters
Small jar of pepperoncini (whole or sliced) your choice
Pine nuts (optional)

-Add marinated mushrooms, cucumbers, shaved carrots, celery.  All work well!  You may have noticed, I left out the anchovies in mine...uh, yeah, I don't do anchovies. 

The night before:
*Layer 1 slice provolone, 1 slice salami, 1 slice ham.  Roll up, and repeat for as many "roll-ups" as you'd like in your antipasto.    Wrap in plastic wrap and refrigerate overnight. 
*Or, just slice and spread around the top separately.  I just think the spirals look pretty.

Wash all your lettuce and dry well.  Roughly chop up and lay in your favorite platter or large dish.  Spread all the other ingredients over the top.  Slice the cheese & meat roll-ups into 1/2 pieces (like a spiral) and place over the top of the salad. 

Just before serving, roast the pine nuts and sprinkle over the top of all.


Dressing:
Click to enlarge
Mix:
1/4 cup of balsamic vinegar
1/4 cup of extra virgin olive oil
1 tablespoon of dried parsley
1 tablespoon of grated Parmesan cheese
1 tablespoons of dry oregano
Salt & pepper to taste

Stir well. Pour over antipasto salad right before time to serve and toss.

If you don't want to make your own dressing, a really good one is a packet of Wishbone Italian dressing.  Use balsamic vinegar or wine vinegar, instead of apple cider, and follow the directions on the package. 


Be encouraged!
"By this we know love, that he laid down his life for us, and we ought to lay down our lives for the brothers."    -1 John 3:16


Friday, July 18, 2014

Chocolate Cloud


A Dream of a Dessert!

Click to enlarge

You won't believe how easy this impressive dessert is to make, and how many "oohs" and "ahhhs" you'll hear when you bring it to the table.   And...you don't even have to tell them that it's the simplest dessert EVER!  Oh, and did I mention my son-in-law, Mike, requests this for his birthday every year, instead of a cake.  He has good taste!

This is made for a Punch Bowl.  But, if you don't have a punch bowl, a large clear glass bowl or Trifle Dish (pictured)would work too. The clear bowl or Trifle dish are smaller, though.   Of course, that means there's extra goodies to munch on before the big reveal.  Don't you love the way I think of the positive side?  Ha! 
The whole recipe will serve 35 people...great for a party!

I know...another chocolate dessert!  I warned you from the get-go, I'm a full-fledged Chocoholic!  I just can't help myself. 


Click to enlarge

Ingredients

1 box of Chocolate Cake Mix (bake according to directions)
4 boxes of Instant Jello Chocolate Mousse
1 pkg. Skor candy bars (crushed in a plastic bag)
2 (16 oz.) containers of Cool Whip

Bake cake as directed, let cool.  

Tear cake into pieces and layer the crumbled cake, chocolate mousse, crushed Skor bars, and Cool Whip into a punch bowl in that order.  Repeat layers once more, saving some of the crushed candy to garnish the top.

Did I lie?  Easiest dessert ever!


"All Scripture is God-breathed and is useful for teaching, rebuking, correcting and training in righteousness, so that the man of God may be thoroughly equipped for every good work."   -2 Timothy 3:16-17


Wednesday, July 16, 2014

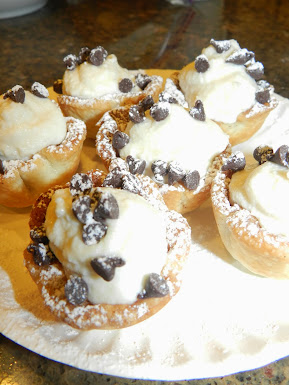
Mini Cannoli Cups


Wow!  Cannoli in a Cup!


Cannoli...that sweet, creamy Italian Pastry, that I find hard to find in the south.  I tried to make them with my grandmother, when I was a young mother.  We both were ready to run to the nearest Italian Bakery and just buy them!  Oh, how we laughed at the mess we were making.  Needless to say, I've never tried making the shells from scratch again.  

But, oh, how I love Cannoli!  So, I was really so happy when a friend shared this recipe with me!   I won't say they taste like the "real" thing, but they are wonderful little treats and much easier to make.  My husband liked to call them "Canolli-olli"...please don't ask me why!  LOL!

Drain the ricotta in the fridge overnight through a cheesecloth covered strainer, over a bowl.  You'll be surprised how much liquid will be at the bottom of your bowl in the morning!  This process makes the cream thicker.  Now, mix this with the sugar in your blender or food processor and it will be extra creamy. 

Click to enlarge
Cups:
Pie crust for 2, 9" pies (Pillsbury refrigerated is fine, if you don't make your own)
3 Tbsp. granulated sugar
1 tsp. cinnamon

Instructions:
Heat oven to 425'F. 
 
Make your favorite pie crust or roll out the store-bought onto a floured work surface.  

Sprinkle each crust with sugar and cinnamon.  Lightly roll  your rolling pin over sugar and cinnamon to press into pastry. 
 
Use a 2 1/2-3" round cutter, cut out pastry rounds.  Lightly press each round into an ungreased mini muffin tin.

Bake about 10 minutes or until pastry cups are golden brown.  Cool completely in pans, about 15 minutes.  Remove from muffin cups to cooling racks.

Click to enlarge
Filling:
2 cups ricotta cheese (drain in a colander a few hours or overnight)
8 ounces Mascarpone (cream cheese can be substituted for this)

1 1/2 cups confectioners' sugar
1 teaspoon vanilla
1 cup mini chocolate chips


Beat ricotta cheese and mascarpone together in a bowl until smooth; add sugar and vanilla. Continue to stir mixture until sugar is completely incorporated. 

Place the filling in a 1-gallon plastic storage bag and chill while you make the cups. Filling may seem thin but will firm up slightly when it’s refrigerated.

Cups should be filled shortly before they are eaten so the don’t get soggy. 

To fill them, cut one bottom corner of the storage bag and pipe a small amount into each pastry.   If you want to make them ahead of time, you can make the cups and the cream and keep them separate. Once you are ready to eat, you can fill, decorate and serve.

A Tip from Grammy:
-Replace chocolate chips with crushed pistachio nuts or cinnamon chips...both are delicious!
-You can use all ricotta cheese. I just love the combined flavors of the ricotta and mascarpone.
- If the filling isn't thick enough, add 1 Tbsp. cornstarch and mix with a hand mixer. Check the consistency and repeat until it's no longer runny. Draining the ricotta overnight helps prevent a runny filling.

Be encouraged!
"He has made everything beautiful in it's time."  Ecclesiastes 3:11

Monday, July 14, 2014

Macaroni & Cheese (Italian Style)


A Twist on an Old Favorite

Now, I know I'm living in the south, but I was raised in an Italian home, so this is Mac & Cheese Italian Style.   Don't be afraid to give it a try...everyone loves it!

This was an absolute favorite of my mom's and I'd make it for her whenever I could.   She was a great cook and taught me so much!   

I got her old wooden recipe box after she passed away.  Some recipes are in her own handwriting, some typed (with an actual typewriter, haha), but, the best and funniest memories come when I pull up one that she wrote down all the ingredients and left out all the measurements.   Now that's tough to recreate!


This is an easy dish to divide in half for a small family, or make a large one...great for leftovers.  Sometimes, I'll pour it into two separate pans and freeze one for later. 

Ingredients:
16 oz. Elbow macaroni  
1/2 c. butter
2 tsp. chopped onion
1/2 c. flour
2 tsp. salt
1/4 tsp. pepper

Cook macaroni as directed on package, drain.  Melt butter in saucepan; then saute onion in butter.  Add flour, salt & pepper.  Mix well.

Gradually stir in:
4 c. milk

Stir constantly until smooth and thickened.

Add:
1 Tbsp. parsley
1 tsp. sweet basil
1 pimiento, chopped (optional)
4 cups sharp cheddar cheese, shredded (add a little at a time to avoid clumps)

Stir in all ingredients above, over low heat, until cheese melts.  Mix sauce and macaroni and pour into a 13x9" greased (I use cooking spray) baking pan. 

Shred an extra 1 cup cheddar cheese to garnish top, then sprinkle with Paprika.

Bake in preheated oven at 350 degrees for 30 minutes or until cheese is melted and bubbly.


Be encouraged!
"For it is by grace you have been saved, through faith—and this is not from yourselves, it is the gift of God— not by works, so that no one can boast."    -Ephesians 2:8,9


Saturday, July 12, 2014

Black Bottom Cupcakes


Rich and gooey chocolate cream cheese cupcakes!


I don't know if you've tried these, but they are really delicious!  As you get to know me better, you'll find that I'm a true "Chocoholic" and will probably post a lot about my love for the luscious cocoa bean!   I was so thrilled to find out it's actually good for us...in moderation, of course.  And it comes from a bean, which is a plant, which makes it a vegetable!  You're welcome!  Haha!

But, I digress.  Anyway, these are simple and always a family favorite around here.  I've been making these for over 30 years to everyone's delight. 

Give 'em a try and let me know what you think.  The cake batter I use has been in the family for generations...it doesn't use shortening, eggs or butter (dietetic maybe?)  Probably not...but oh, so tasty! And if you want to take a shortcut, it's perfectly fine to use your favorite chocolate cake mix!


INGREDIENTS FOR FILLING:
1 8oz. pkg. softened cream cheese
1 unbeaten egg
1/3 c. sugar
1/8 tsp. salt
1/2-1 cup chocolate chips, mini

Beat all ingredients until smooth, then stir in chocolate chips.  Set aside.

CAKE BATTER:
1 1/2 c. all-purpose flour
1 tsp. baking soda
1/2 tsp. salt
1 c. sugar
1/4 c. Hershey's unsweetened cocoa

NOW ADD:
1 c. water
1/3 c. oil
1 Tbsp. vinegar
1 tsp. vanilla

Stir together until well blended.

Preheat oven to 350'F.

Spray cupcake tins with Pam or use liners.

Fill 1/3 cup filled with chocolate mixture.  Top each with heaping teaspoon of cream cheese mixture.  Sprinkle with sugar and blanched almonds if desired.  

Bake for about 25-30 minutes or until inserted toothpick comes out clean.  DO NOT OVERBAKE...you actually want them to fall a little in the middle.


No frosting necessary...these will melt in your mouth!


Be encouraged!
"Never doubt the power of prayer."