Thursday, April 30, 2015

Grammy's Salisbury Steak

A 1960's favorite comfort food!

Yes, I know Salisbury Steak is really just "glorified" hamburger.  Many people just know it as that frozen dinner that comes with a side of mac and cheese.  Let me just say...yuck!   

The name is a reference to James Henry Salisbury, an American physician who promoted the consumption of beef for the maintenance of general health.  Well through the 1960s in America, Salisbury steak was a frequent offering on the dinner table.

People who have only eaten this food in an institutional setting, like school cafeterias, are sometimes surprised to learn that it can be quite interesting when prepared by a competent cook with high-quality ingredients, especially if the cook plays around with the basic recipe to add interesting flavors.


This is so much more than what it seems, and makes a lovely family dinner.   I made some changes to the original recipe, added some flavors that we like and, voila, it was a big hit.  I doubled the gravy so we could have it over the egg noodles that were on the side.  That was a good idea, because it was delicious. 


Ingredients:

Meat Mixture:
1/3 cup French onion soup
1/3 cup Cream of Mushroom or Golden Mushroom Soup
1 1/2 lbs. ground beef
1/2 cup dry breadcrumbs
1 egg
1/4 tsp. salt
1/8 tsp. pepper (or to taste)

Gravy:
1 Tbsp. all-purpose flour
remainder of both soups
1/2 cup ketchup
1 Tbsp. Worcestershire sauce
1 tsp. dry mustard
1/2 cup water
1/4 - 1/2 cup sliced mushrooms (opt.)

In a large bowl, mix together 1/3 cup condensed French onion soup with ground beef, bread crumbs, egg, salt and black pepper.

Shape into 6 oval patties.

In a large skillet over medium-high heat, brown both sides of patties in a little olive oil.

Pour off excess fat.

In a small bowl, blend flour, remainder of both soups until smooth.

Mix in ketchup, Worcestershire sauce, dry mustard, and water.

Pour over meat in skillet.

Cover, and cook for 20 minutes, stirring occasionally and moving the patties so they don't stick.


Be encouraged!
Surely, Lord, You bless the righteous; You surround them with Your favor as with a shield.   -Psalms 5:12

Monday, April 27, 2015

Zucchini Blossom Fritters-Frittelle di Fiori di Zucca

Get your veggies in a flower!


If you have a garden this year, and are growing zucchini but have never used the blossoms...well, do I have a surprise for you!   Italians from Calabria (where my family comes from) knew how to take advantage of every part of that wonderful vegetable.  My mom made these every day there were blossoms on the zucchini, and we never got tired of them.  So, run out now and plant some zucchini!  This is one recipe you'll want to make sure you try!

It's important that you get out and pick them early in the morning, (like, even before you drink your coffee) while the blossoms are wide open and before any bees or bugs take up permanent residency in there.  These flowers close up by mid-morning and that's it for the day.  After you clean them, just cover them with plastic wrap and they'll stay fresh in your refrigerator until time for dinner.  You can pick them with the stems or snap them right off the fruit.  This won't affect the growth of your zucchini, I promise!

And please, don't be afraid to eat some flowers...no matter how pretty they look, they taste even better! 

Ingredients:
8-9 squash blossoms, open by tearing down one side, then fold together
1 cup all-purpose flour
1 tsp. baking powder

1 egg
1/4 cup grated Parmigiano-Reggiano
1/2 tsp. dried parsley
1/2 tsp. salt

Pinch of black pepper
water as needed to thin batter
Oil for frying

Fiori di zucca
The lovely zucchini blossom
Don't forget to prepare the squash blossoms by inspecting each flower for dirt, bees or bugs.  (Tiny critters tend to hide inside the blossoms.)

Gently rinse under slow running water, and dry with paper towels. Remove the pistil from inside each flower, and the green spikes from around the bottom.

Place on paper towels and pat dry.


Mix together flour, baking powder, egg, grated cheese, parsley, salt, and a pinch of pepper so that you get the consistency of thin pancake batter.  (If it's not thin enough, add water, a little at a time.)

Heat oil for frying in a skillet until medium hot.  (You’ll want enough in there so the blossom will  sink to the bottom and then fluff up while frying.  Be sure not to fry too many together at one time.)

When the oil is hot, dip each blossom into the batter and let excess drip back into the bowl.    Place gently into hot oil.  Fry on both sides until golden brown, this should take a few minutes on each side.  Drain on paper towels; sprinkle with a little salt, if desired.


Be encouraged!
Don't allow temptation to get the best of you, cast your cares on the Lord. "Behold, I am the LORD, the God of all flesh: is there any thing too hard for me?"  -Jeremiah 32:27

Sunday, April 26, 2015

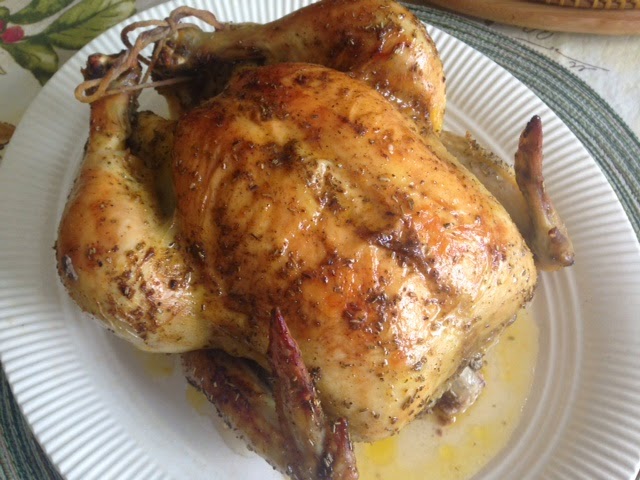
Oven Roasted Rosemary Chicken

Great tasting chicken with very little effort!


Sunday dinner or any day of the week, this makes a terrific meal!  Just serve with your favorite sides and a salad, add rolls and you've got a happy family.

We love chicken in our house, it's one of the most versatile meats to use in so many different and delicious dishes.  This one literally fell off the bone as I was carving it.  It also made a wonderful gravy from all the flavorful juices.

This served us well as a dinner for 4 with a plate of leftovers for sandwiches.  

Remember, you can change up the seasonings to suit your own taste.  Let's say you like more garlic, or less...do it your way.  Make it your own and enjoy the process!

Ingredients:
4-5 lb. whole roasting chicken
1/4 cup butter
1/8 cup olive oil
1/2 onion, cut up
1/2 celery stick, cut up
1 lemon, sliced
1 tsp. dried rosemary
1 tsp. granulated garlic
1/4 tsp. paprika
salt and pepper

Heat oven to 350'F.  Line bottom of roasting pan with aluminum foil. 

Remove giblets, neck from chicken and cut off extra skin.  Rinse chicken under faucet and dry with a paper towel.  Place in foil lined pan and tuck wings back under the breast.  (I tried, but I couldn't get mine to stay there...oh well.)

Cut up onion, celery and lemon to fill the cavity.

Melt butter and olive oil together in a small pan; add seasonings and stir well.  Brush over all of the chicken and under wings, etc.

Cover tightly with aluminum foil and bake for 1 1/2 hours.   Remove foil and return to oven to bake an additional 30-40 minutes or until meat thermometer reaches 180' and juices run clear.

Remove and let set for 20 minutes before slicing.


Be encouraged!
"Call to me, and I will answer you, and show you great and mighty things which you do not know."  -Jeremiah 33:3

Strawberry Shortcake

Classic shortcake with a touch of cinnamon!


Whenever I think of Strawberry Shortcake, I think of the biscuit or scone type, not the sponge cake little cups that you can get at the grocery store. 


Strawberries have been around for more than 2000 years, and there are records that show that ancient Romans enjoyed them. 

Shortcake has been around, at least since Shakespeare, it was even mentioned in his play "The Merry Wives of Windsor".   But, putting strawberries and shortcake together seems to be more of a United States tradition.  Go USA!  

As with many classic dishes, when the timing is right, the dish becomes a national favorite, and this one definitely is just that!  The only thing that I did to "spice" it up a bit (get it?)  was to add a touch of cinnamon, because we all love it!

I tend to use the Bisquick recipe for the biscuits, it's quick, easy, and the family all love them.  But, if you'd rather bake your own from scratch...go for it! 

Ingredients:

Strawberries:
1 qt. (4 cups) strawberries
1/4 cup sugar
dash of cinnamon

Wash and hull strawberries, then slice into quarters or slices (your preference).  Add sugar and cinnamon; stir and cover.  Let stand while you make the biscuits.

Quick Biscuits:
2 1/3 cups Bisquick (Original)
1/2 cup milk (I use Half and Half)
3 Tbsp. sugar
3 Tbsp. butter, melted

Preheat oven to 425'F. 

In medium bowl, stir Bisquick mix, milk, 3 tablespoons sugar and the melted butter until soft dough forms.  On ungreased cookie sheet, drop dough by 6 spoonfuls.   Bake 10 to 12 minutes or until golden brown.

Split warm shortcakes; spread a little butter on the bottom half; drop a spoonful of your favorite whipped cream over the butter, then a scoop of strawberries.  Add the top half of the biscuit, and top with strawberries and more whipped cream.


Be encouraged!
Only God can give us the greatest gift of all. "For the wages of sin is death; but the gift of God is eternal life through Jesus Christ our Lord."  -Romans 6:23

Saturday, April 25, 2015

Italian Sausage and Peppers with Ziti

With Ziti or in a sandwich...a winner every time!


Sausage and peppers was a regular meal in our house, growing up.  I can still see my dad cutting up the peppers and mom cooking the sausage that dad had made himself.  I can't even describe how good it was!   Sometimes, they would roast the sausage in the oven first, and then add the onions and peppers.  It didn't matter how they made it...it was delicious every time!  

I don't ever remember them adding wine, but I decided to try it one day and we all loved the mild flavor of the wine.  Just the right touch, but, you don't have to add wine, it'll be just as good without it.

One of my favorite memories was on New Year's Eve.   I can still see us all at my Aunt Helen and Uncle Augie's house, celebrating with the family.  They lived upstairs from my grandparents, in a small duplex unit.  It was amazing how many relatives they could fit it that place.  I loved going there anytime, they were like my second set of parents, and my cousin, Ro, was more like a sister!

Anyway, that night, you could smell the sausage cooking, but we weren't allowed to eat it until midnight.  You can imagine, once that clock struck twelve, it was sausage and pepper sandwiches for everyone!  Awesome!

Another delicious way to make this is to stir in cooked ziti when the sausage and peppers are just about done, and let it all simmer together for a few minutes.  It really is delicious whatever your preference. 

Ingredients:
1 pkg. (5 links) Premio Italian sausage (mild or hot, your choice)
2 Tbsp. butter
1 Tbsp. olive oil
1 large onion, halved and sliced
1/2 red onion, sliced
4 cloves garlic, minced
1 large red bell pepper
1 large green bell pepper
1 tsp. dried basil
1/2 tsp. dried oregano
salt and pepper to taste
1 (14.5 oz.) can crushed tomatoes (optional)
1/4 cup red wine, (optional) (whatever kind you like to drink)

Prick the sausage all over with a fork, then place in a large skillet over low heat, and brown on all sides, cooking until tender.  Remove from skillet, and slice links into 1" pieces. (I like to cut them in a diagonal...it's pretty.  Ha!)


Melt butter and olive oil in the skillet on medium heat.  Stir in the yellow onion, red onion, and garlic, and cook 2 to 3 minutes.  Mix in red bell pepper and green bell pepper.  Season with basil, oregano, salt & pepper.  Stir in crushed tomatoes and wine (both are optional).  Continue to cook and stir until peppers and onions are tender.

Return sausage slices to skillet with the vegetables. Reduce heat to low, cover, and simmer 15 minutes, or until sausage is heated through.

Serve over pasta, polenta or on Italian rolls for sandwiches (our favorite.)

P.S. The family gave this a "thumbs up" all the way!


Be encouraged!
"Rejoice in the Lord always. I will say it again: Rejoice! Let your gentleness be evident to all. The Lord is near." - Philippians 4:4-5

Wednesday, April 22, 2015

Strawberry Cream Pie

Fresh strawberries, cream cheese and chocolate!


When I need something extra special to take to a fun get-together, this is the recipe I like to make.  This pie looks and tastes fabulous.  It pleased even those ladies who don't like pies.  Really, how do you not like pie?  But, I digress...it was "gobbled" up in minutes!  I never saw a pie disappear so fast.

It's so simple to put together and if pie crust isn't your thing, just substitute it with a graham cracker or cookie crust.  It will still taste great and look give a beautiful presentation.

Ingredients:
1 9" pie crust (may be homemade or store-bought)
Bake as directed; let cool before filling.

2 (16oz.) containers fresh strawberries
While crust is baking, wash strawberries, let drain; hull and slice.

Cream Cheese Layer:
1 (8oz.) pkg. cream cheese
1 cup heavy whipping cream
1/3 cup sugar
1/2 tsp. vanilla
1-1 1/2 Tbsp. milk

Beat whipping cream until stiff peaks form. 

In a separate bowl, beat cream cheese until fluffy. Gradually add in sugar and vanilla.
Fold cream cheese mixture into the beaten heavy whipped cream. until evenly combined;
spoon into cooled pie crust.

Glaze:
1 cup water
1 cup white granulated sugar
3 tbsp. cornstarch
pinch of salt
1 (3oz.) box strawberry gelatin


In a medium saucepan, whisk the water, sugar, corn starch, and salt; bring to a boil and continue stirring until thickened.   About 2-3 minutes.  Remove from heat and whisk in strawberry gelatin.

Add the sliced strawberries and stir gently until all are coated with the glaze.  Gently pour onto cream cheese filling.

For Drizzling:
1 Tbsp. shortening
½ cup milk chocolate chips
Melt 1 Tbsp. shortening and ½ cup chocolate chips in microwave, stirring every 30 seconds until smooth.  Drizzle over strawberries.  Refrigerate until set; and keep leftovers in the fridge.  (If you have any!)


Be encouraged!
I lie down and sleep; I wake again, because the Lord sustains me. -Psalm 3:5

Tuesday, April 21, 2015

Grammy's Old-fashioned Beef Stew

Classic "Stick to Your Ribs" stew!


Again, this is my mom's "recipe" and I've put that word into quotes because she actually had no recipe.  In fact, some of her recipe cards don't have any measurements at all...just the basic ingredients, and then you are on your own.  Thanks, Ma!  Haha!  But, this is the way she taught me to make stew, so I'll pass it on, because it's so good!

I really never use a recipe for stew either, so one day, while making it, I measured and figured out the approximates for the ingredients I like to use.  Now, here's the disclaimer...you don't have to use everything listed, I don't every time!   It depends on my mood and what's in the pantry.  The meat and veggies are the staples in stew.  The rest is up to you!  Phsst...sometimes I even add a splash of wine. 

I almost forgot!  If you like to use your crockpot, just brown the meat first with the onions, then empty the pot (along with the juices) right into your slow cooker.  Add everything else and set it on high for a few hours or so, low if it will be in there all day. 


Ingredients:

2 lbs. lean stew beef (sometimes I cut up an eye round roast, if I can't find lean stew beef.)
1 cup chopped onions
1/2 tsp. salt (you can use seasoned salt, if you desire)
1 Tbsp. olive oil
1 (10.5oz.) can condensed beef broth (optional)
hot water
3 cups potatoes, cut up
2 cups carrots, cut up
1 large stalk celery, cut into chunks
2 Tbsp. flour
1/3 cup cold water
1/2 cup peas (optional)
Salt and pepper to taste


Heat oil in a Dutch oven or large saucepan; add beef and salt.  Cook over medium-low heat until the meat is browned on all sides, then add onions.  (This usually takes 30-45 minutes, because I like my meat fairly tender before I add anything else.  I do add small amounts of water during this process to keep the meat from burning.)

Add beef broth (opt.) and hot water to the pot until liquid level is about 1 inch above the beef.  Cover and reduce heat to low; cover pot and simmer for 1 1/2 to 2 hours or until the meat is tender.

Add potatoes, carrots, peas and celery.  Cover and cook, stirring occasionally, for 20-30 minutes longer, until vegetables are tender.

To thicken the stew, if desired, combine the flour with 1/3 cup cold water; stir until smooth.  Gently stir flour mixture into the pot a little at a time, using as much as necessary to make the stew as thick as you like.

Add pepper, then taste to see you it needs more salt.


"Great is the LORD and most worthy of praise; his greatness no one can fathom. One generation will commend your works to another; they will tell of your mighty acts."   - Psalm 145:3-4

Monday, April 20, 2015

Easy Baked Parmesan Tomatoes

Spicing up plain tomatoes!


Fresh tomatoes can be so much more than just another veggie in your salad.  We love them covered in herbs and parmesan cheese, then baked in a hot oven.  And you will too!  They are the perfect side dish, so flavorful and delicious.  I made these for dinner yesterday as a side with meatloaf and macaroni and cheese...super! 

I used the dried herbs yesterday, because I didn't have any fresh ones, but I love using them whenever I can.  Now that it's spring, I'll be planting basil, oregano, rosemary and a few other favorites.  It's the best feeling to just go to my backyard and cut as much of these wonderful herbs as I need.  The best part is that, usually, there's more than enough for the season and I end up freezing them to use the rest of the year.

Ingredients:
2 large tomatoes, cut into 3-4 slices each (they will be thick)
1/2 cup grated parmesan
1/4 tsp. dried oregano (you can add more if you like oregano)
Salt and Pepper to taste
Olive oil to drizzle, optional 
Fresh parsley or basil for garnishing


Preheat oven to 400' F.

In a small bowl toss together the Parmesan cheese, dried oregano, salt and pepper. Top each tomato slice evenly with the Parmesan cheese mixture. Drizzle with a bit of olive oil, if desired.

Bake for about 5 to 10 minutes or until you notice the cheese starts to turn gold. 
Garnish with fresh parsley or basil and serve.


Be encouraged!
Pray always.  "Give your whispered thoughts to God, and the common moments become uncommon."   -Max Lucado


Sunday, April 19, 2015

Candy Bar Brownies

Two in one treat...unbelievably easy and delicious!


I couldn't believe it when my friend told me how good these are!  After all, it's only two main ingredients...a boxed brownie mix and candy bars! 

The candy bars are placed between two layers of brownie batter.  It melts a little into the brownie, but still stays intact enough to recognize the candy.

They taste of rich, chocolate brownie and then the toffee almond candy comes through and takes it to a whole different level of deliciousness!  "Magical" is the word my granddaughter uses to describe these, too...that's one of her favorite words for Grammy's cooking.  Gotta love that kid!

Oh, you don't have to use a box mix either, it works great with your favorite homemade brownie recipe.  But, if you need a quick dessert, just use the box mix, I won't tell anyone.

There's a Grammy Tip at the bottom of the recipe that I didn't know about before I cut these. Try it, it really works! 

Ingredients:
1 Family-size box brownie mix (for 9x13" pan) OR your favorite homemade recipe (plus whatever ingredients are on the box directions)
2 (6.8oz.) Giant-size Hershey's Symphony candy bar, or any large similar bar. (Symphony is our favorite.  But, I'm willing to try Butterfingers, Kit Kats, Reese's Peanut Butter Cups and others.)

Preheat oven to 350'F. or 325'F. if using a glass baking dish.

Prepare brownie mix according to the box directions.  Stir just until all mixed.  Don't over-stir brownies, they'll get really tough.

Prepare 7x11" pan.  Line pan with aluminum foil and spray with non-stick cooking spray.

Pour 1/2 brownie mixture into the pan and spread out with a spatula.

Unwrap candy bars and break into individual sections.  Place on top of the batter, so they cover the surface.  (I always have a few pieces leftover.  But, don't worry, they never go to waste.  :))

Pour remaining batter over the candy bar sections and spread to the edges to cover candy.

Bake according to the brownie mix time and temperature. This takes about 35-40 minutes.

Let cool, then lift from the pan using the edges of the foil, before cutting.

A Tip from Grammy:
-If you want brownies that aren't torn apart when cutting, just use a plastic knife. They'll look professional!


Be encouraged!
Shield me from the influences of evil people, Lord, so I’ll be free to live life Your way. ~Psalm 119:134


Friday, April 17, 2015

My Mom's Homemade Manicotti

Melt in your mouth Manicotti!

Hot out of the oven.
Growing up Italian was always a food-centered adventure.  A picnic always had at least one tray of baked macaroni, and a trip to Sylvan Beach required three days worth of cooking. Our idea of eating out usually meant going to one of the relatives for a meal.  My aunts were all good cooks, and they all had a specialty. Get-togethers were a treat for our family...and our taste buds!

Now, one of the many specialties my mom made were Manicotti, and I'm talking "melt in your mouth" manicotti. 

Yes, I know, every Italian child felt her mother was the greatest cook in the world!   Can I help it if mine really was?  Hehe!


Shells:
4 eggs                                     
Homemade shells
1/4 tsp. salt
1 cup water
1 cup flour

Beat eggs slightly; add salt and water, blend together.  Add flour and mix until smooth.  (This will be a thin batter, the consistency of a creamy soup.)

Heat a 7"or 8" non stick skillet on med/high heat. When hot pour 1/4 cup of the crepe batter into the skillet and tilt skillet to spread batter evenly on bottom of entire skillet.

Cook until the crepe starts to look dry and until the edges start to pull away from the skillet. this should take about 1 minute or less.  Then, using a spatula, gently flip the crepe. Cook the other side for about 20 seconds.

Remove from skillet and repeat process until all the crepes are done.   Stack them as you would pancakes.


Rolled Manicotti
Filling:
2 lb. whole milk Ricotta

4 eggs
3/4 tsp. salt
3/4-1 cup grated parmesan or Romano cheese
1/4 tsp. black pepper
1 Tbsp. chopped fresh parsley OR 1-2 tsp. dried parsley
Mozzarella, cut into strips, about 1/2Wx2L" sticks (opt)

Mix all ingredients, except Mozzarella,  together well. 

Place a couple of heaping tablespoons of the mixture on top of each crepe, press a mozzarella "stick"  into the mixture, then roll up. (It's like a little surprise for your mouth. Yum.)


Line the bottom of a greased pan with your favorite sauce.  If using store-bought sauce, you will need approximately 1 large jar for 1 batch of crepes.

Ready to devour

Cover the crepes with sauce and grated cheese (optional).


Bake at 350 degrees for 30-45 minutes until the crepes are heated through.


This recipe serves 4-6


Be Encouraged!

"Blessed is the one who perseveres under trial because, having stood the test, that person will receive the crown of life that the Lord has promised to those who love him."   - James 1:12


Monday, April 13, 2015

Marinated Beef Tenderloin with Merlot Sauce

A 5-star meal!

When we moved south, away from all the family, we went from cooking for 20 people for Sunday dinners and holidays, to cooking for two.   Then, my daughter and her husband came to visit and decided that North Carolina was the place for them too. 

Our first Christmas with just the four of us felt like it might be a little lonely (ya think?), so I decided to cook something really special that Christmas Eve, something I knew I couldn't afford to make for a crowd, unless we owned a cattle farm, that is!

That was when I found this  incredible roast tenderloin recipe on the Betty Crocker website!   The cost of the meat is a bit expensive, but for a special occasion, it is so worth the extra splurge!  Mashed potatoes and your favorite vegetable go great with this.  It's the meat that's the star of this special meal.  This recipe serves 4, but it would make a wonderful anniversary or Valentine dinner for two...don't you think?


Ingredients:

Marinated Beef:

1 beef tenderloin roast (3lbs.)
1/3 cup red wine vinegar
1/3 cup olive oil or vegetable oil
2 Tbsp. chopped fresh basil OR 2 tsp. dried basil
2 Tbsp. chopped fresh oregano OR 2 tsp. dried oregano
2 Tbsp. chopped fresh parsley OR 2 tsp. dried parsley
1/2 tsp. black pepper
2 cloves garlic, finely chopped

In re-sealable food-storage plastic bag or large glass or plastic dish, place beef.  In small bowl, mix remaining beef ingredients; pour over beef.  Seal bag or cover dish; refrigerate at least 8 hours but no longer than 24 hours, turning beef several times to coat with marinade.

Heat oven to 425ºF.  Remove beef from marinade; discard marinade. Place beef on rack in shallow roasting pan. Insert meat thermometer so tip is in center of thickest part of beef.

 Roast uncovered 40 to 45 minutes or until thermometer reads 140ºF (medium-rare doneness). Cover beef loosely with tent of foil. Let stand 15 to 20 minutes or until thermometer reads 145ºF. (Temperature will continue to rise about 5ºF and beef will be easier to carve as juices set up.)       


Merlot Sauce:

1 cup currant jelly
1 cup Merlot, Zinfandel or nonalcoholic red wine
1/2 cup beef broth
2 Tbsp. butter

In 1-quart saucepan, heat all sauce ingredients to boiling, stirring occasionally; reduce heat to low.  Simmer uncovered 10 to 15 minutes, stirring occasionally, until sauce is slightly reduced and syrupy. Cut beef across grain at slanted angle into thin slices.  Serve with sauce.

 
Tip: Get a jump on preparing this tasty dish by marinating the beef the evening before. Make the sauce up to 3 days ahead and store, covered, in the refrigerator; reheat on low for 5 to 10 minutes before serving with the beef.


"Let not your hearts be troubled.  Believe in God, believe also in me."  John 14:1
                      

Sunday, April 12, 2015

Spring Salad with Fruit, Feta and Pecans


A blue ribbon salad! 

We love salads with lots of goodies in them, like meats, cheeses, nuts, etc.  By the time we're done, it becomes the whole meal.  Like at a salad bar...a little bit of everything!  You can even change up the fruit, strawberries or blueberries in the spring/summer, dried cranberries in the fall.  It's all good!
 
But, sometimes I just want a light and delicious salad with fruit and mixed greens.  I love this one because it has feta and pecans, along with the fruit.  It's great as an opening dish to a holiday or company meal.
 
This recipe puts everything into a bowl for self serve, but I like to make the individual plates and carry them to the table for each guest, kind of restaurant style.  They look so beautiful and are just delicious.  You can use the dressing recipe below or make your favorite.
 
Ingredients:
4 cups spring mix greens, washed and rinsed well
4 oz. can of mandarin oranges, drained
6 medium strawberries, washed and sliced
1/3 cup crumbled feta cheese
1/4 cup chopped pecans
Raspberry vinaigrette, recipe below
 
Wash and dry the greens well, then just before serving, plate each individual salad bowl with the greens. 
 
Divide the oranges, strawberries, feta cheese and chopped pecans onto each plate for a beautiful presentation.  (The pecans can be toasted for a nuttier flavor, if desired.)
 
Lightly drizzle with the vinaigrette just before serving, and put the rest of it on the table in case anyone wants more with their salad.
 
Raspberry Vinaigrette Recipe
6 tsp. raspberry preserves
1 Tbsp. balsamic vinegar
3 Tbsp. extra virgin olive oil
Juice of 1/2 lemon
 
Blend all ingredients together well, (a small whisk works great), drizzle over salad just
before serving.
 
 
Be encouraged!
“Prayer should be the key of the day and the lock of the night.” – George Herbert

Saturday, April 11, 2015

Fiesta Party Dip

A hit at every party!

I've made this now so many times, I can't count...and every time I bring it to a get-together, it disappears almost immediately!

The first time I had it was at a Christmas party at my neighbor's home.  She had a big crockpot full and it was going fast.  It was delicious!

After that, I started making it for our little family gatherings on holidays, much to my their delight.   But, I made it in small batches because there's only six of us who live here in North Carolina. 

So, I went out and "splurged" on a $10 mini crockpot and it's just right for this recipe.  You can make bigger batches by doubling or tripling the ingredients.  Oh, then you'll want to use the big crockpot.  Hehe!

Ingredients:
1 lb. Jimmy Dean Regular Sausage
1 can Original Rotel with diced tomatoes and green chilies
1 8oz. pkg. cream cheese
1 or more bags of tortilla chips
Fully cook sausage in a pan, breaking it apart with a wooden spoon until it looks like ground sausage.   Drain well; place back into pan.
Add Rotel and cream cheese.  Simmer for approximately 10 minutes or until all ingredients are thoroughly blended.  Pour into small crock pot to keep warm.
Serve hot with tortilla chips.

A Tip from Grammy:
-Occasionally stir the dip so it doesn't harden around the edges or develop a film on top...not that it lasts that long.
-So easy to double or triple, depending on the crowd. 
-You can add an extra can of Rotel, it won't change the consistency.


Be encouraged!
"These are a shadow of the things that were to come; the reality, however, is found in Christ." - Colossians 2:17

Ooey Gooey Lemon Brownies

Ooey Gooey Goodness!

When my church choir decided to put together a cookbook a few years ago, a friend donated this scrumptious recipe for these lemon brownies.  They're so good, and a lemon-lover's dream!

I had a hard time waiting  for them to cool off enough, so I could take some pictures...and then my family started eating them.  That made me think I'd better get those pics before they were completely gone!  Haha!

Soft and chewy, just like a chocolate brownie, and can be thrown together in a matter of minutes.   Just the type of dessert that is so satisfying.  I know you'll want to keep a box of lemon cake mix and cream cheese around for a quick summer treat that everyone will absolutely love.  I know I'm going to do just that!


Ingredients:

Crust:
1 box lemon cake mix
1 egg
1/2 c. butter, melted

Preheat oven to 300'F.  Spray a 9x13 pan with cooking spray.

Combine cake mix, melted butter and one egg to a soft dough.  Press into the bottom of the pan.  Set aside while you make the next layer.


Ooey Gooey Layer:
1 box (approx. 3 1/2 cups) confectioners' sugar
8 oz. cream cheese, softened

2 eggs

Mix powdered sugar, softened cream cheese and remaining two eggs until smooth, about 1-2 minutes.  Pour on top of unbaked crust.

Bake at 300 for 40-50 minutes until top is golden brown.


Be encouraged!
But he was pierced for our transgressions, he was crushed for our iniquities; the punishment that brought us peace was on him, and by his wounds we are healed.  -Isaiah 53:5

Friday, April 10, 2015

Green Beans and Italian Breadcrumbs

A delicious, no fuss, side dish!


My granddaughter bought a huge bag of fresh green beans from Costco the other day, and I was thrilled!  I love green beans, any way they're made.  Sometimes I'll just blanch them and eat them for a snack...so good!

The whole family loves green beans, and I like to prepare them in different ways, so they won't tire of them.  Personally, I could eat them everyday!

My sister-in-law made these for her family all the time, and it was at her house, that I first tried them.  They were so delicious!  These are super simple to make and you can use canned green beans or get the fresh in the microwave bag...just keeping it simple!  

It's the kind of basic recipe you can make as is, or add some other flavors, such as:  grated lemon peel, basil, parmesan.  Get as creative as you like!  As I always say, "Play with your food!" 

Ingredients:
1 lb. fresh or 2 (15 oz.) cans cut or whole green beans
2 Tbsps. butter
2-3 cloves garlic, finely chopped or use a garlic press
1/4 cup Italian style breadcrumbs 


Directions
Snip and clean fresh beans, blanch in boiling water for 5 minutes.  If using canned, just drain liquid.

Peel garlic cloves and put them through a garlic press into the pan.  Add butter and beans; sauté together on low heat for 5-10 minutes.
 
Turn off heat and toss green beans with the bread crumbs until coated.
 
Place in serving dish and enjoy!

Be encouraged!
Hope deferred makes the heart sick, but a longing fulfilled is a tree of life.  -Proverbs 13:12

Tuesday, April 7, 2015

Sausage-Lentil Soup

A delicious, heart meal "one-pot meal!"


Lentil soup has always been a staple in our house, since I was a kid.  I don't know what it was about having this warm, hearty soup for dinner that made it so special.  Maybe it was that loaf of homemade Italian bread we ate with it...haha!

Anyway, I decided to make today a "souper" Tuesday!  I started out just wanting to make Split Pea Soup to use up the rest of the ham from Easter dinner.  Then my hubby (who always has such good ideas) said, "Do you have enough ham to make Lentil Soup too?"  

Well, I didn't.  But, I did have some great hot Italian sausage that I hadn't used yet.  So, off to the store we went to get the dried peas and lentils.  Now, we have two of my family's favorite soups simmering for tonight's dinner.

And the Italian bread is going into the oven!      

Ingredients:

1/2 lb. dry lentils
2 Tsp. olive oil
1 small onion, chopped
1 stalk celery, chopped
1 clove garlic, minced
1/2 lb. bulk Italian sausage, mild or hot-your preference (or smoked ham)
1 (14 oz.) can diced tomatoes (optional)
2 cups beef or chicken broth (I like beef)
2 cups water
salt and pepper to taste

Sort and rinse lentils.

In a medium saucepan, heat oil.  Stir in onion, celery and garlic until tender.

In a separate pan, brown sausage, breaking it up as it cooks. Drain.  (If you can't find bulk, buy the links and cut off the casing.  Then break apart in the frying pan.) 

Add lentils and remaining ingredients, including sausage.  Bring to a boil 

Reduce heat, cover and simmer until lentils are tender and soup gets thick.

Add more hot water or broth (chicken or beef) if necessary.

Serves 4-6


Be encouraged!
"Seek good, not evil, that you may live. Then the LORD God Almighty will be with you, just as you say he is."  - Amos 5:14